Your PC feels slower than it used to. Apps pause longer than normal. Boot times stretch out. Or Windows shows a vague disk warning that doesn’t explain much. At that point, most people jump straight to “My SSD is failing.”
Sometimes that’s true. Often, it isn’t.
The real problem is that SSD health isn’t visible in an obvious way. Windows hides most of the useful details, so people either ignore the issue or panic and replace hardware they didn’t need to.
This guide walks you through checking SSD health safely, step by step, without guessing or breaking anything.
Why this happens (in a nutshell)
SSDs don’t fail the same way old hard drives did. There’s no grinding noise or slow death spiral. Instead, SSDs wear down silently as data is written over time. Every drive keeps internal counters that track this wear, temperature, and error rates.
Windows can read some of this data, but it doesn’t always show it clearly. On top of that, many SSD-related slowdowns come from file system issues, low free space, or heat—not actual hardware failure.
I’ve seen plenty of systems feel “on the edge,” even though the SSD health was completely fine.
Step 1: Check what Windows already knows
Why this step matters:
Before using any extra tools, it’s important to see whether Windows itself is detecting problems. Windows constantly monitors storage drives for obvious failures, corruption, and communication errors. If something is seriously wrong, this is often where it shows up first.
Starting here avoids unnecessary tools and helps rule out major issues quickly.
What to do:
- Press Win + E to open File Explorer
- Right-click your main drive (usually C:)
- Select Properties → Tools
- Under Error checking, click Check
What to expect:
- If Windows says “No errors found,” that means it isn’t seeing any immediate file system problems
- If it asks to scan the drive, allow it to run. This is safe and reversible
Guardrail:
If Windows asks to scan on restart, let it finish once it begins. Forcing a shutdown mid-scan is one of the few ways this process can actually cause disk problems.
Step 2: Confirm Windows recognizes the drive as an SSD
Why this step matters:
Windows treats SSDs and hard drives very differently behind the scenes. If Windows misidentifies the drive, it may apply the wrong optimizations or report misleading performance behavior.
This check also confirms that Windows is communicating with the drive correctly—something that can break after hardware changes or firmware updates.
What to do:
- Press Start, type Defragment and Optimize Drives, and open it
- Look at the Media type column for your main drive
What to expect:
- It should say Solid state drive
- “Optimize” for SSDs does not mean traditional defragmenting, so this is normal and safe
If it does not show as an SSD, stop here. That usually points to a driver or firmware issue, not a dying drive.
Step 3: Read the SSD’s own health data (SMART)
Why this step matters:
This is where real SSD health information lives. SSDs track internal statistics such as wear level, error counts, and remaining lifespan using SMART data. Windows doesn’t show this in a friendly way, but the drive itself knows exactly how it’s doing.
A read-only tool like CrystalDiskInfo simply displays this data. It does not repair, modify, or “optimize” anything.
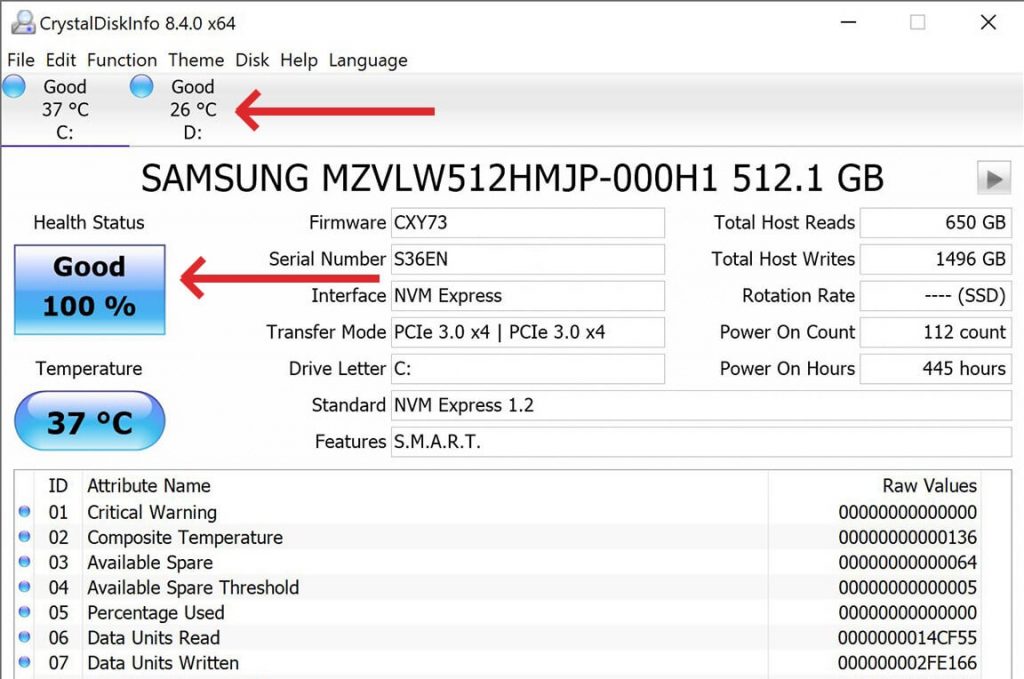
What to look for:
- Health Status: Good / Caution / Bad
- Remaining life or percentage used (varies by brand)
- Temperature: Sustained temperatures above ~70°C can shorten lifespan
What this tells you:
- Good means the drive is operating within normal limits
- Caution usually means wear is increasing or errors are being logged
- Bad means replacement planning should start immediately
Reassurance for beginners:
Opening this tool cannot damage your SSD. You’re only reading information the drive already keeps.
🛑 STOP – Avoid this common trap:
Avoid any software that claims to “fix” SSD health or extend lifespan. Wear levels cannot be reversed, and those tools often write aggressively to the drive, which makes things worse.
Step 4: Check for file system issues (optional but useful)
Why this step matters:
A healthy SSD can still feel unstable if Windows files are damaged or inconsistent. This step checks the structure of the data Windows relies on, not the physical drive itself.
It’s especially useful if you’ve seen crashes, freezes, or improper shutdowns.
What to do:
- Right-click Start → Terminal (Admin)
- Type the command below and press Enter:
chkdsk C: /scan
What this command does:
It scans the file system for errors while Windows is running, without locking the drive or forcing a restart.
What to expect:
- “No problems found” means file structure is fine
- If errors are found, Windows will clearly explain whether further action is needed
If Windows suggests a deeper repair that requires a reboot, pause and read carefully before agreeing.
Pro tip
SSD health may be perfect, but performance can still drop if free space is low. Once an SSD falls below about 15–20% free space, slowdowns become common. This is one of the most overlooked causes of “SSD problems.”
When to worry—and when not to
- If the health status shows Caution or Bad, then back up important files first and plan a replacement
- If health is Good and Windows reports no errors, then the issue is almost certainly elsewhere (startup apps, background updates, heat, or software)
What’s next?
If your SSD health looks good but Windows 11 still feels slow, the problem is almost certainly somewhere else.
I walk through a full, safe diagnosis process here — starting with the most common causes and fixing only what actually matters:
👉 Deep dive [ Windows 11 Running Slow? How to Diagnose and Fix Performance Issues (Complete Guide) ]
SSD health checks don’t need guesswork or risky tweaks. Start with Windows’ own checks, confirm the drive is recognized correctly, then read the SSD’s internal health data. If everything looks good, you can stop worrying about the drive—and focus on fixing what’s actually slowing the system down.